- Home
-
PATTERNS
- BUNDLES
- MAKER HUB
-
LEARN BAGMAKING
-
FREEBIES
-
BLOG
- IN-PERSON WORKSHOPS
-
COLLABORATE
- NEWSLETTER SIGNUP
-
CONTACT ME
- CONTACT ME
-
MEET AMANDA
-


If your zipper tabs disappear into the seam instead of standing out, this simple sewing tip will help you create cleaner, more polished zipper pouches every time.

Plain cotton webbing is practical, durable, and easy to sew—but it doesn't have to look plain. Learn how to transform basic webbing into beautiful custom bag handles with this beginner-friendly technique.

Want to see exactly how these handles come together?
In this step-by-step tutorial, I'll show you how to make Fabric Overlay Handles from start to finish using cotton webbing, quilting cotton, and Pellon 809 Decor-Bond. It's a simple technique that gives your bags a polished, custom look without adding unnecessary bulk.
If you've ever looked at a strip of cotton webbing and thought, "This works...but it needs something," you're not alone.
Fabric Overlay Handles are created by stitching a strip of fabric directly over the center of cotton webbing, leaving the webbing visible along each edge.
The result is a handle that's still strong and durable but looks far more custom than plain webbing alone.

There are plenty of ways to make bag handles, but this has become one of my favorites.
It adds just enough structure to softer webbing while creating a beautiful decorative accent that ties your handles into the rest of your bag.
Some of the benefits include:
For this technique, I prefer Pellon 809 Decor-Bond.
It adds stability without making the handle thick or bulky, which helps keep the finished handle crisp while still allowing it to bend comfortably.
Could you use something else?
Absolutely.
A lightweight woven fusible interfacing is another good option.
Interfacings with loft—like fusible fleece, Thermolam, or foam—can certainly be used, but I find they create more bulk than I want for this particular technique.

One thing I love about bagmaking is that tiny details can completely change the finished project.
Here are a few things I cover in the video:
These little details only take a few extra minutes, but they really elevate the finished bag.

👉 Shop my favorite bagmaking supplies here:
If you're comfortable sewing a straight line, you can make Fabric Overlay Handles.
Because you're working with cotton webbing instead of constructing traditional fabric handles, this is an approachable technique for beginners while still creating a professional-looking finish.
Even better, it works on a regular domestic sewing machine.
If you're just getting started, these resources will help.
👉 Download my Bagmaker Starter Kit
👉 Browse my PDF sewing patterns
👉 Visit the Beginner Bagmaking Collection
Sometimes the smallest changes make the biggest difference.
Fabric Overlay Handles are a simple way to upgrade plain cotton webbing into something that looks custom, coordinated, and beautifully finished.
I hope you'll give them a try on your next project!
If you do, I'd love to see what you make.
Happy sewing,
Amanda

Learn how to sew a keychain wristlet (key fob) two simple ways—stitched or riveted. This beginner-friendly sewing project comes together quickly and is perfect for using up scrap fabric while creating something you’ll use every day.


If you’ve ever stared at a zipper pull wondering why such a tiny step feels so hard, you’re not alone.
Installing zipper pulls is one of those bagmaking skills that looks intimidating—but once you have the right setup, it becomes quick, predictable, and honestly… kind of satisfying.
In this post, I’m sharing the exact method I use to install zipper pulls on zipper tape, plus the simple tool that makes all the difference.
Most zipper frustration comes from one of three things:
The zipper tape shifts or splits.
The pull goes on crooked.
You feel like you need three hands to make it work.
I use a zipper jig when installing zipper pulls on zipper tape.
It holds the pull steady, keeps the tape aligned, and removes the guesswork—especially when working with #3 or #5 zippers. Once you use it, installing zipper pulls feels simple instead of frustrating.
See the zipper jig I use here.
(Some links may be affiliate links. I only share tools I personally use.)
In the video below, I show how to position the zipper pull in the jig, which side to use for size 5 zippers, how to feed the zipper tape cleanly, and when to cut the tape once the pull is installed.
No overcomplicating—just a clean, repeatable method you can use again and again.
Click here to watch the video tutorial, or click the photo below.

In the video, I’m using natural zipper tape with a gold coil and size 5 zipper pulls from Sallie Tomato. It has a faux metal look with nylon teeth, which makes it a great choice for bags and pouches.
If you ever feel unsure about which bagmaking tools and supplies are actually worth buying, I put together a simple reference to help.
Grab my free Mini Bagmaker Resource List HERE.

If zipper pulls have ever slowed you down or made you hesitate mid-project, mastering this one skill can be a huge confidence boost.
Bagmaking doesn’t have to feel hard. Sometimes it’s just about knowing which tools make sewing feel easier.
Happy sewing,
Amanda

Bulky zipper ends? The fix is simple—zipper tabs. This quick beginner tip makes sewing zippers easier and your bags look store-bought.

Give your handmade bags a polished, professional touch with this easy rolled handle upgrade. Perfect for beginner bagmakers using fabric or webbing straps—no hardware needed!

Struggling to sew zipper pockets that don’t end up crooked or puckered? In this beginner-friendly bagmaking blog, I’m sharing my go-to trick for clean, professional zipper pocket installation using double-sided sewing tape. It’s the confidence boost you need if zippers make you nervous—and yes, there’s even a video tutorial included!

Looking for a simple way to add organization to your handmade tote bags? Learn how to sew a customizable slip pocket into any bag lining with this beginner-friendly tutorial. Perfect for storing your essentials and giving your bag a professional touch—plus, I’ll show you how to pair it with the Easy Charm Tote pattern and the right interfacing for a polished finish!

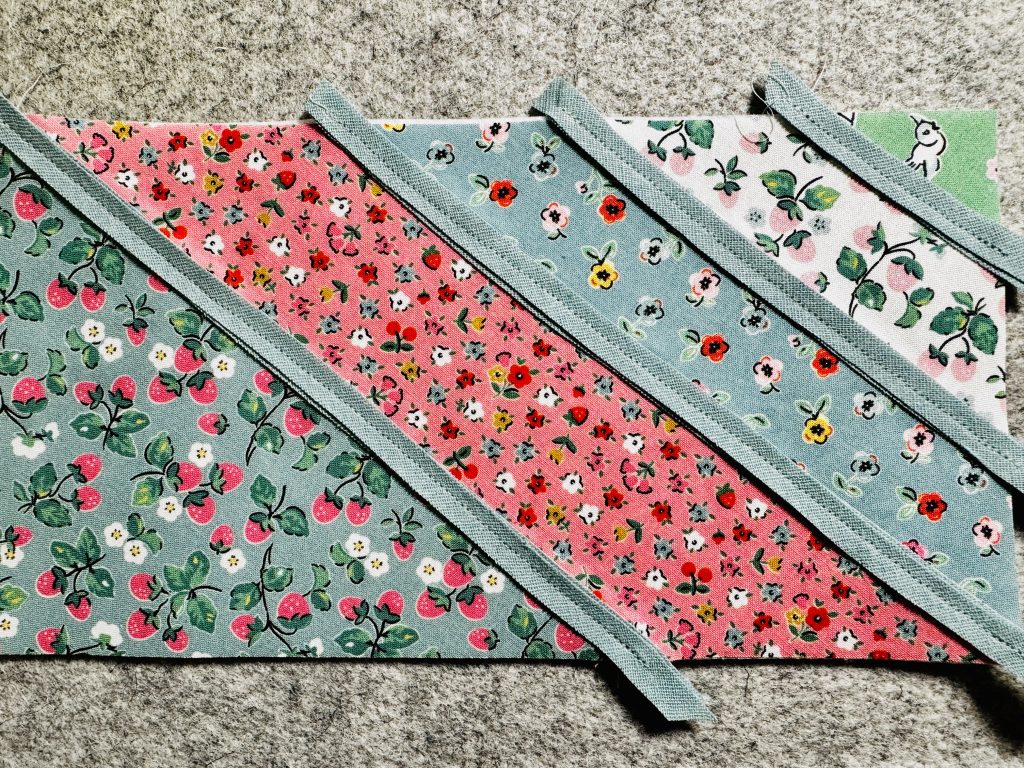
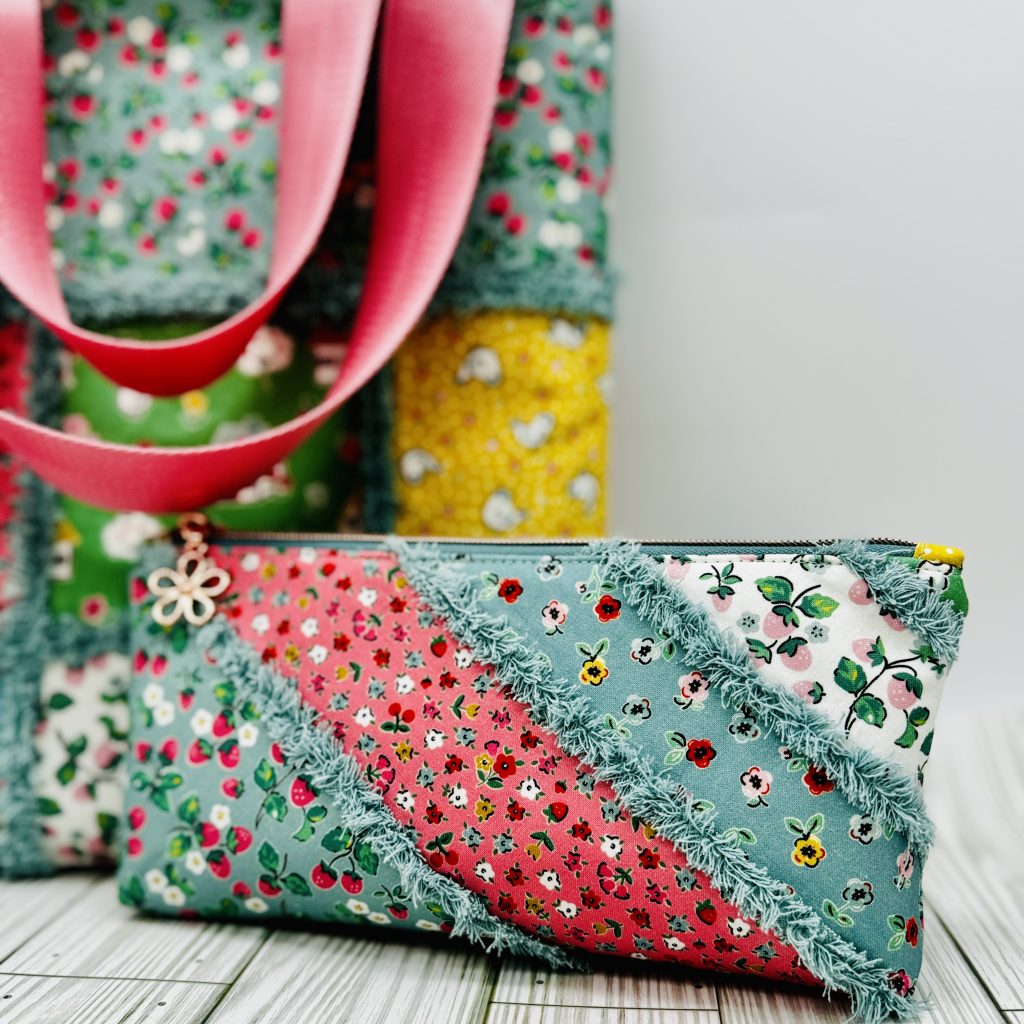
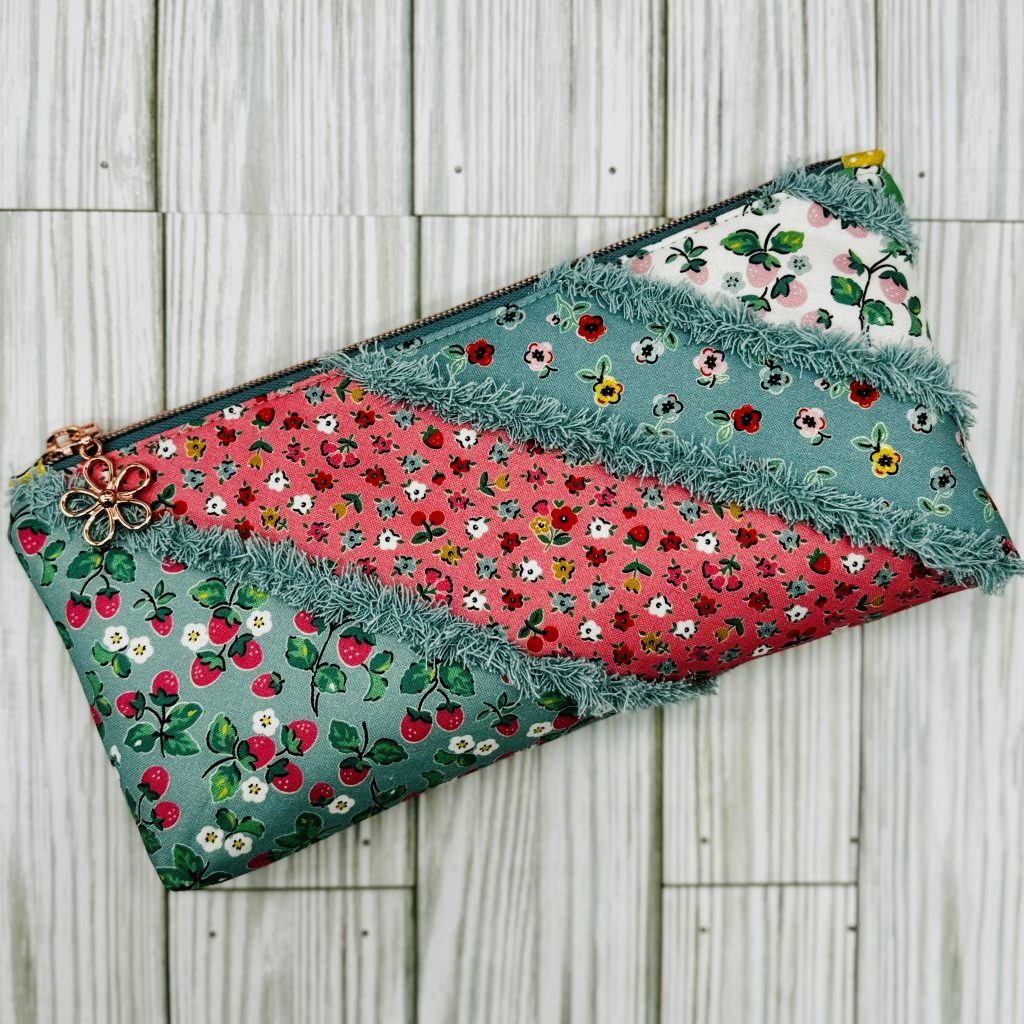
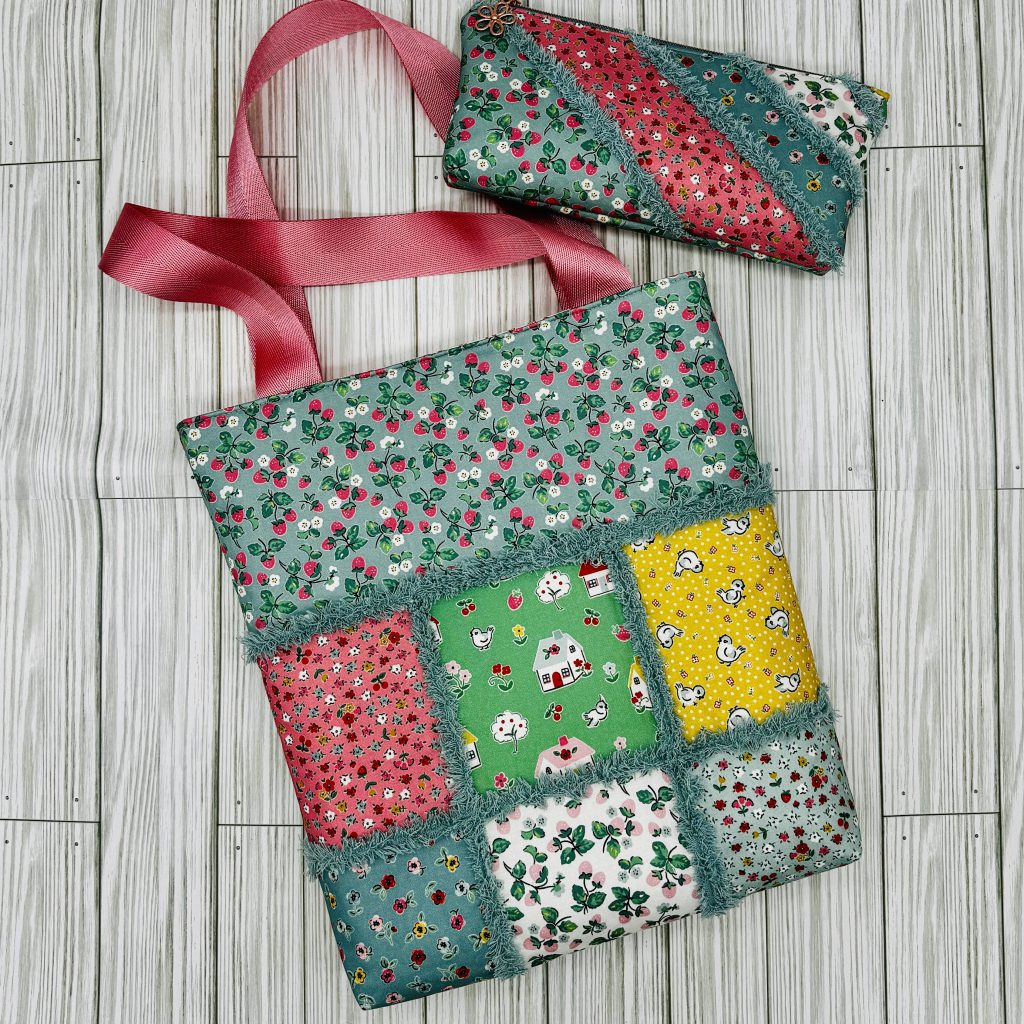
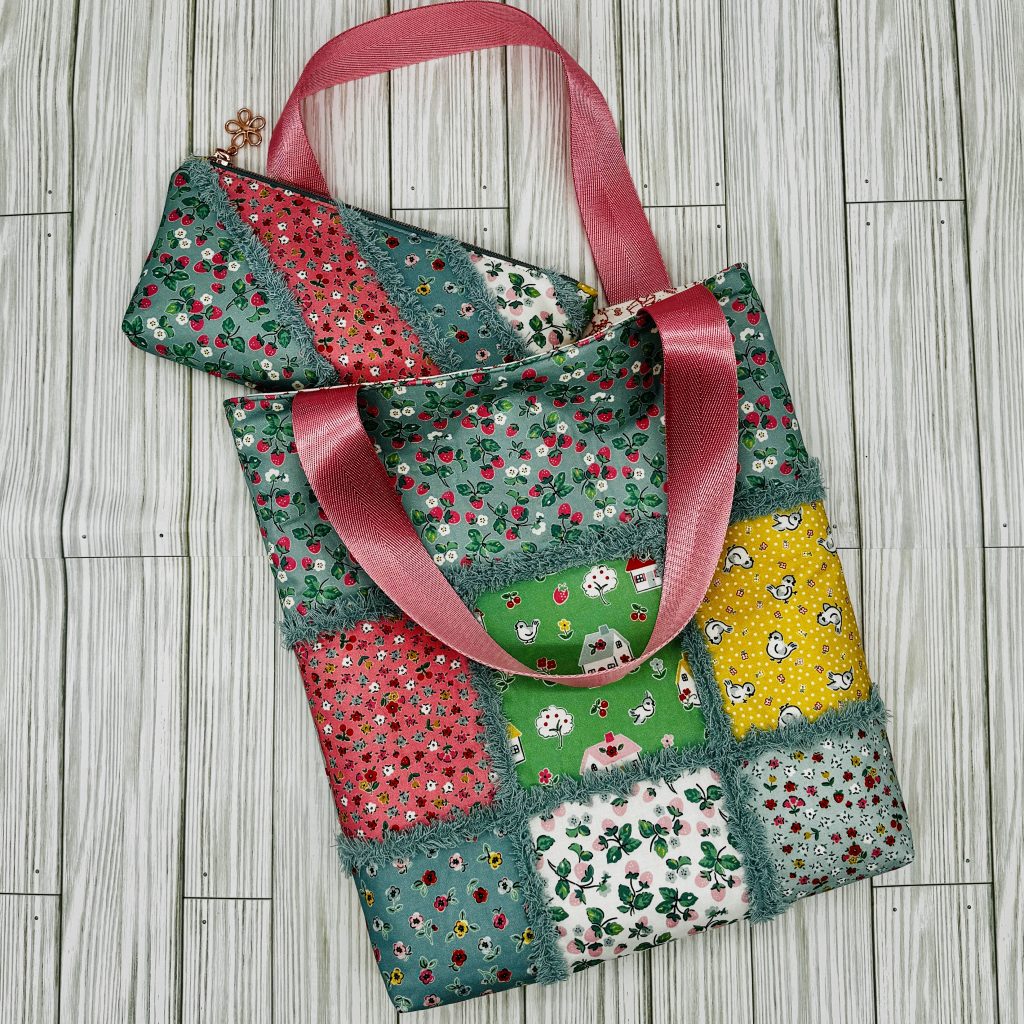
Are you a beginner bag maker looking for a way to make your bags stand out? Let me introduce you to Chenille It, a magical product that can add texture, dimension, and a touch of whimsy to your handmade bags. I’ve recently tried it with my Easy Charm Tote Pattern and Sunset Zipper Pouch Pattern, and the results are nothing short of fabulous! In this post, I’ll guide you through how to use Chenille It and share some tips for incorporating it into your projects.
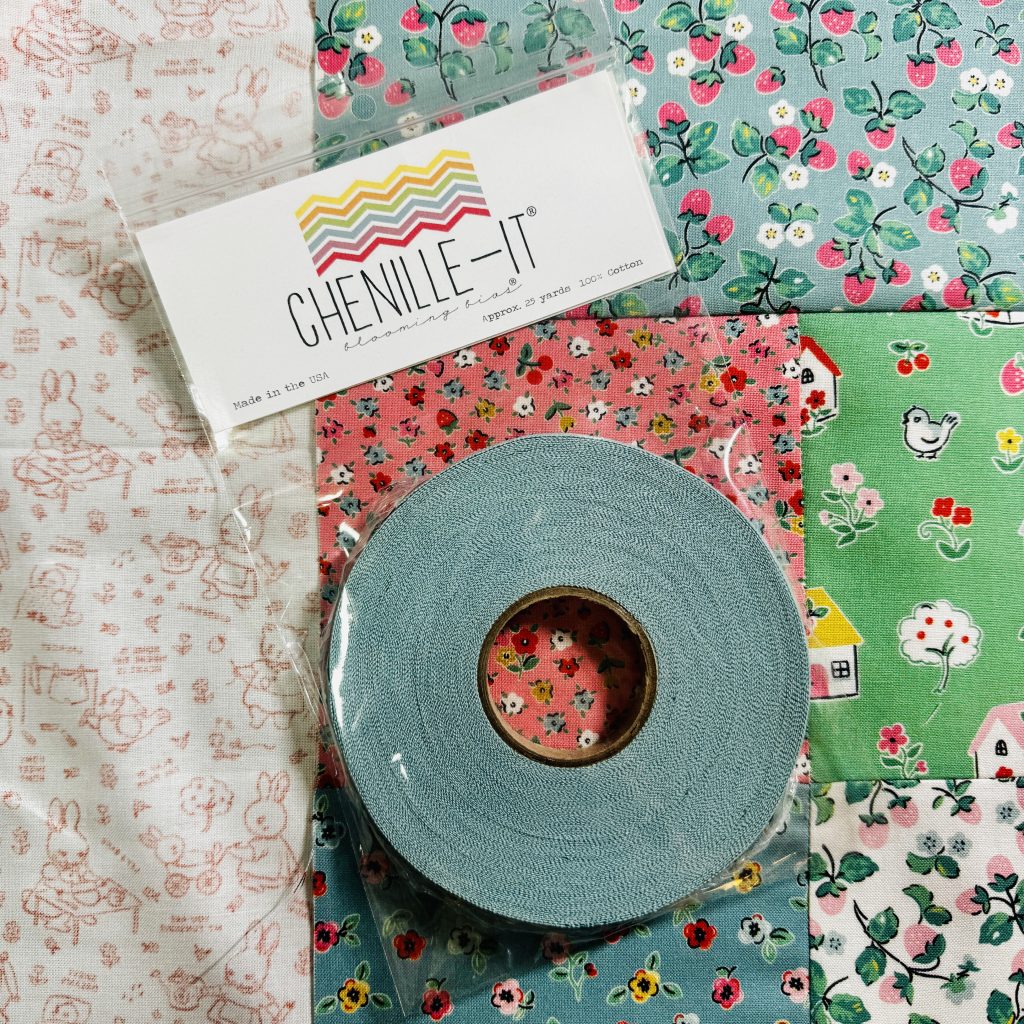
Chenille It is a soft, precut fabric strip that fluffs up when washed, creating a textured, chenille-like effect. It’s perfect for adding a cozy, quilted vibe to your bags while keeping things simple and beginner-friendly. Plus, it comes in a variety of colors, and a 3/8" or 5/8" width option, so you can customize it to suit any fabric or design.
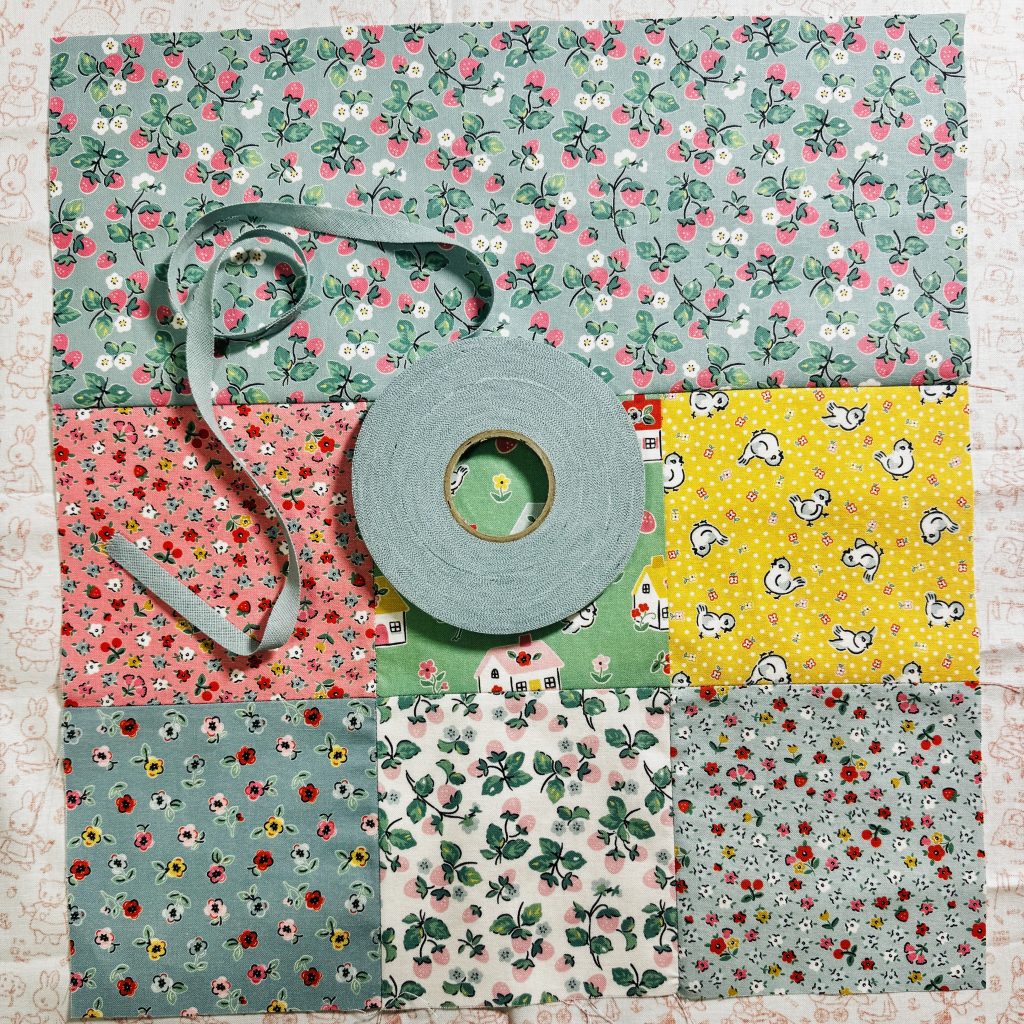

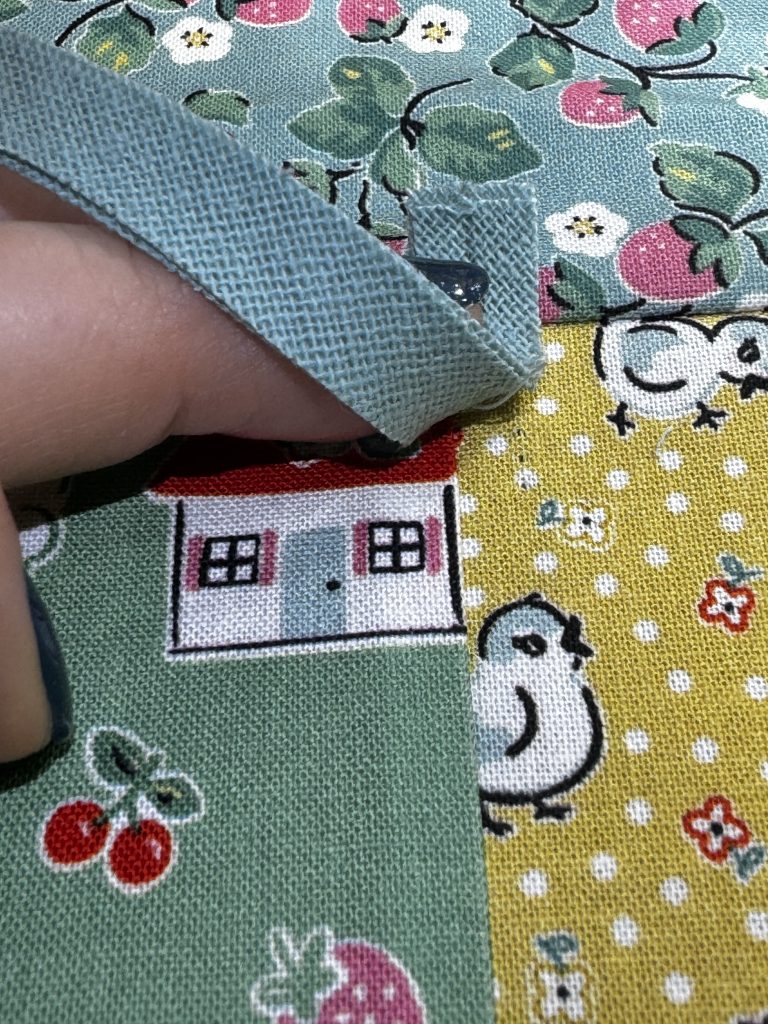
Choose Placement: You will want at least 2 strips of Chenille It for each area you choose to add texture. The more strips you use, the fluffier the project. For the Easy Charm Tote, I recommend applying it to the charm square and top border seams.
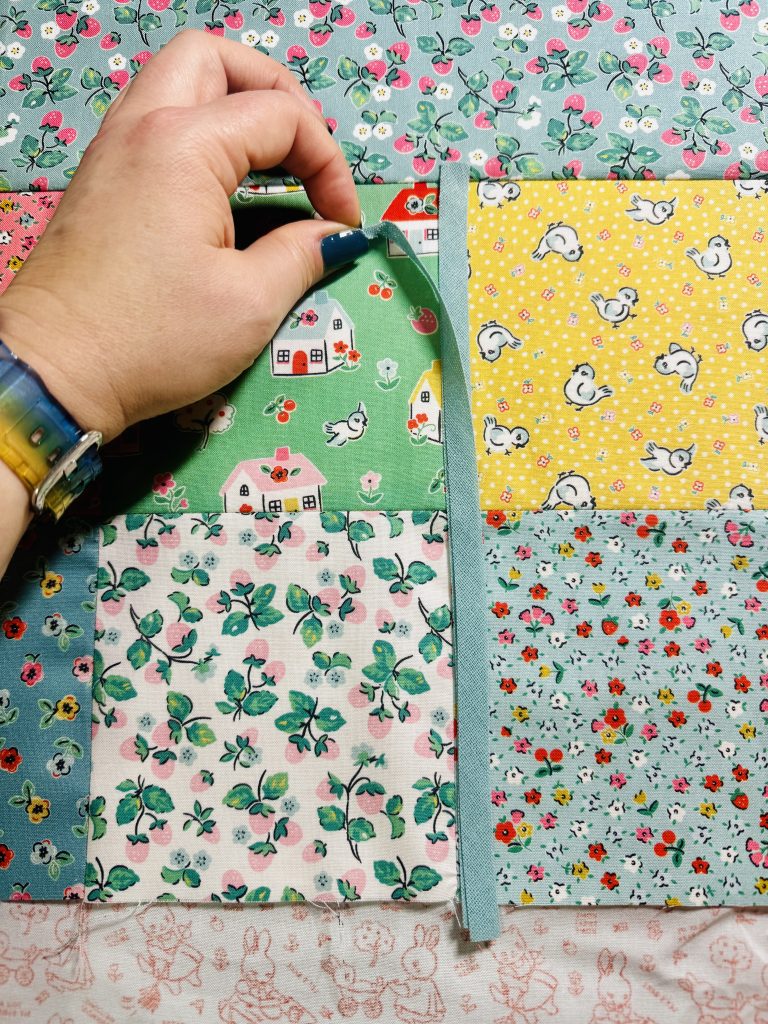
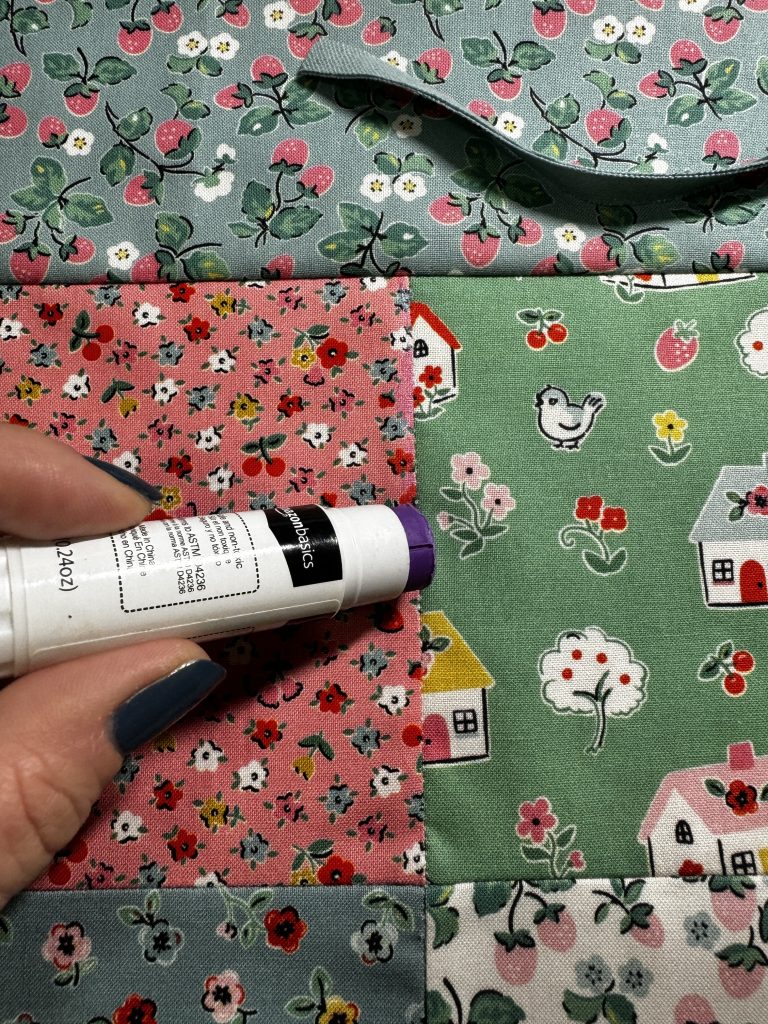
Stitch it Down: I used a glue stick to apply glue to the center of the seams, then placed 2 strips of Chenille It on top. Sew the Chenille It strips in place using a straight stitch down the center of the strip. Make sure it’s securely attached but not over-stitched.

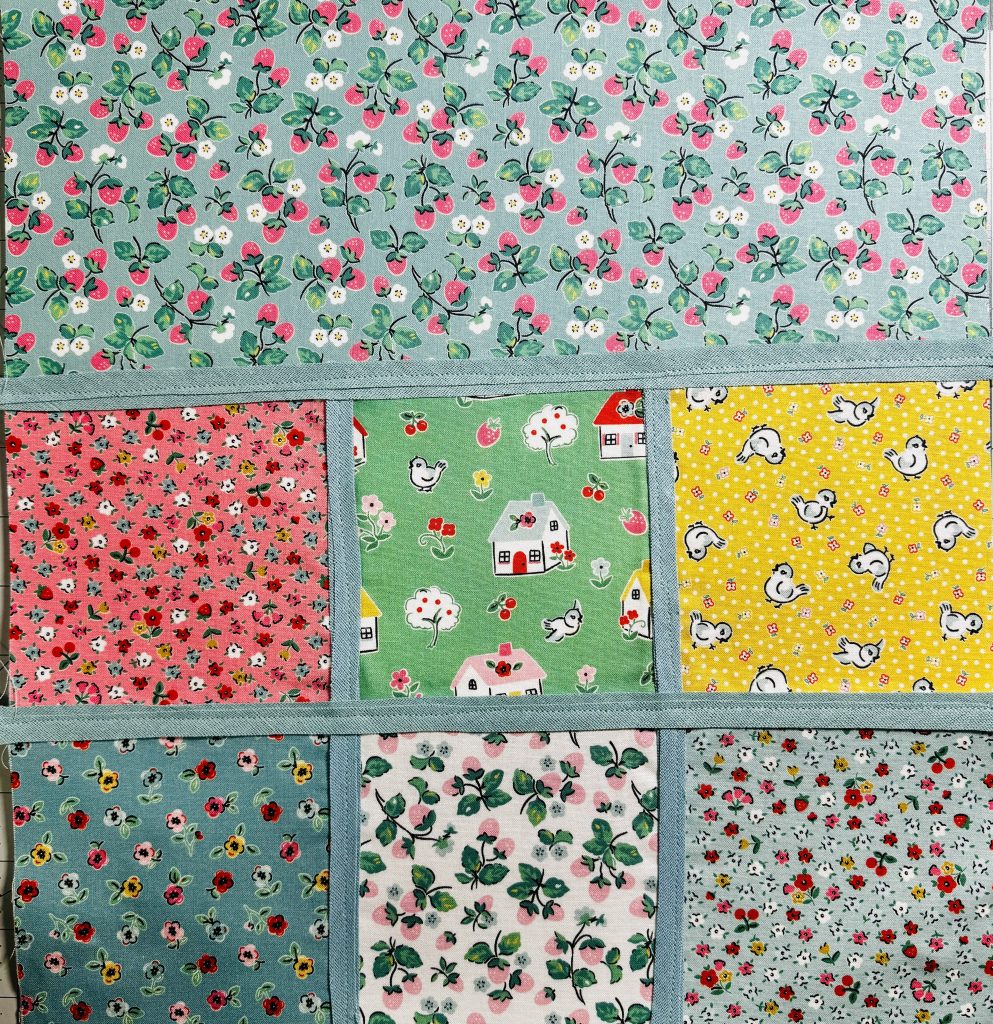
Here's a completed exterior panel with Chenille It applied:
Fluff It: You can achieve the fluffy, signature texture in one of two ways. Chenille It is designed to fluff when you wash and dry your project. You could wash and dry the tote panels to get the fluff. However, I'm not patient enough, and have found that using an old wire eyebrow brush achieves the same look in a fraction of the time.
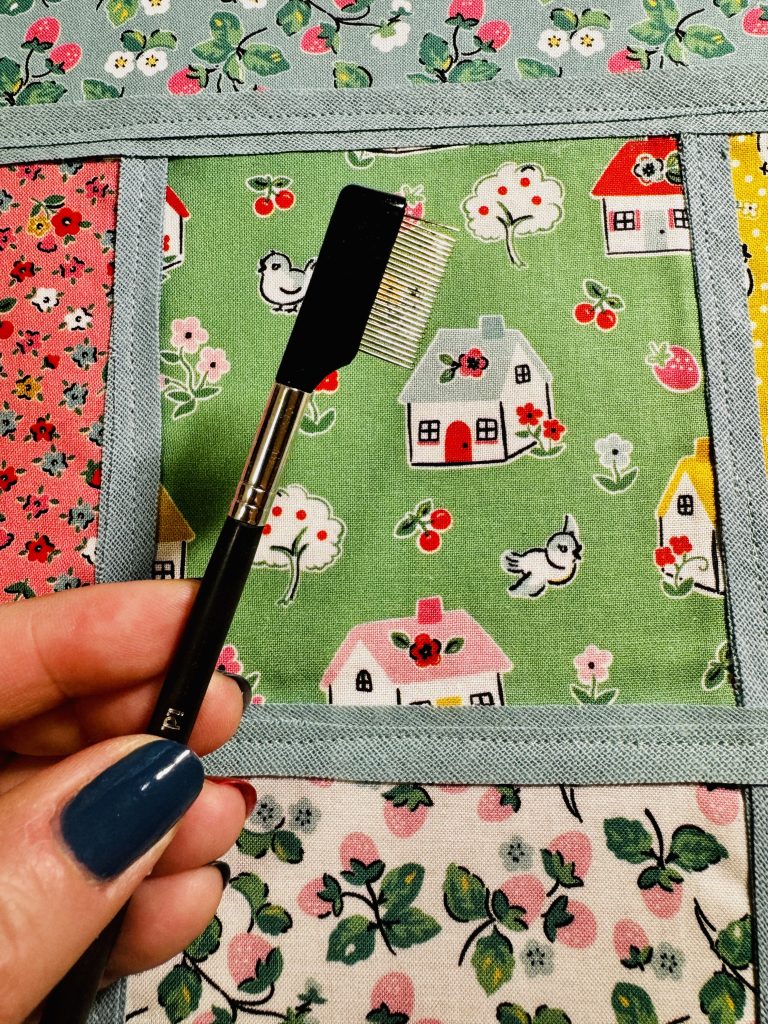
I simply place the wire teeth of the brush and gently scrape in a back and forth motion until the tape "blooms". Do this gently, if you are too rough, you will end up scraping it all off. But, if you do, it's very easy to sew more on and have it look seamless. Here's a quick video showing you how to do it:
Finish Your Bag: Complete the assembly of your Easy Charm Tote as per the pattern instructions.
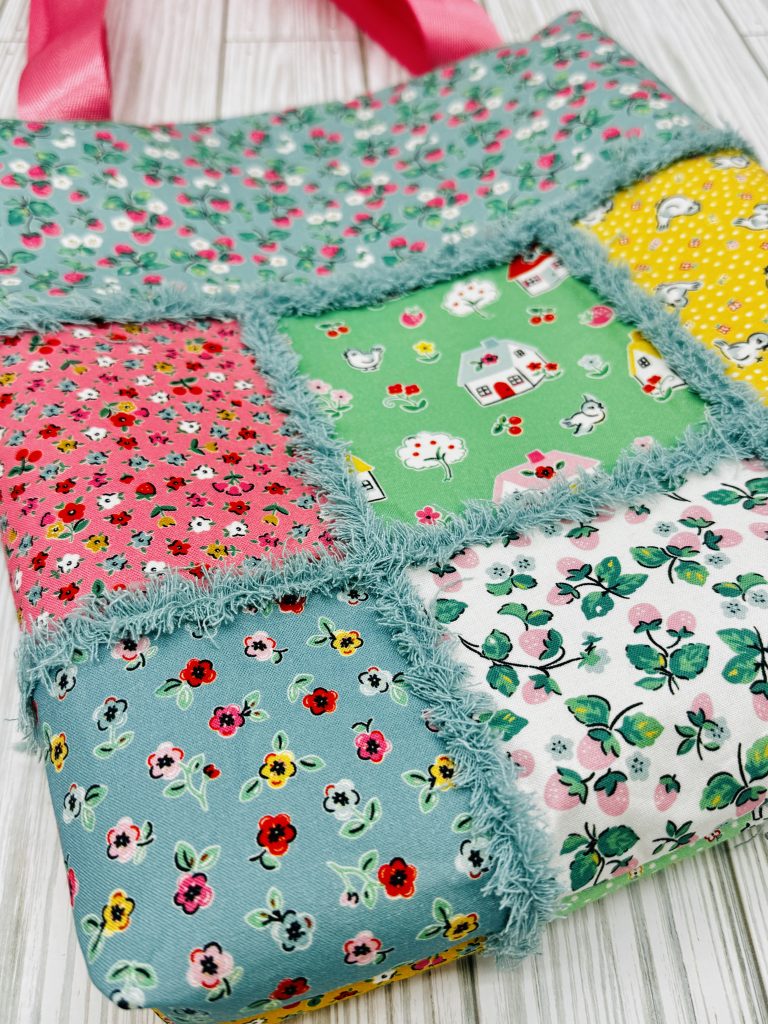
For the Sunset Zipper Pouch, Chenille It works wonderfully along the striped pattern for added flair. Follow the same steps as above, adapting the placement to your pouch design.
I’d love to see how you use Chenille It to enhance your Easy Charm Tote or Sunset Zipper Pouch! Share your photos on Instagram and tag me @bemandythings. Who knows? Your creation might inspire the next beginner bag maker!
With Chenille It, leveling up your bags is easier and more fun than ever. Whether you’re making a tote for a weekend market or a pouch for your everyday essentials, this simple addition can take
Chenille It is a soft, precut fabric strip that fluffs up when washed, creating a textured, chenille-like effect. It’s perfect for adding a cozy, quilted vibe to your bags while keeping things simple and beginner-friendly. Plus, it comes in a variety of colors, and a 3/8" or 5/8" width option, so you can customize it to suit any fabric or design.
Choose Placement: You will want at least 2 strips of Chenille It for each area you choose to add texture. The more strips you use, the fluffier the project. For the Easy Charm Tote, I recommend applying it to the charm square and top border seams.
Stitch it Down: I used a glue stick to apply glue to the center of the seams, then placed 2 strips of Chenille It on top. Sew the Chenille It strips in place using a straight stitch down the center of the strip. Make sure it’s securely attached but not over-stitched.
Here's a completed exterior panel with Chenille It applied:
Fluff It: You can achieve the fluffy, signature texture in one of two ways. Chenille It is designed to fluff when you wash and dry your project. You could wash and dry the tote panels to get the fluff. However, I'm not patient enough, and have found that using an old wire eyebrow brush achieves the same look in a fraction of the time.
I simply place the wire teeth of the brush and gently scrape in a back and forth motion until the tape "blooms". Do this gently, if you are too rough, you will end up scraping it all off. But, if you do, it's very easy to sew more on and have it look seamless. Here's a quick video showing you how to do it:
Finish Your Bag: Complete the assembly of your Easy Charm Tote as per the pattern instructions.
For the Sunset Zipper Pouch, Chenille It works wonderfully along the striped pattern for added flair. Follow the same steps as above, adapting the placement to your pouch design.
I’d love to see how you use Chenille It to enhance your Easy Charm Tote or Sunset Zipper Pouch! Share your photos on Instagram and tag me @bemandythings. Who knows? Your creation might inspire the next beginner bag maker!
With Chenille It, leveling up your bags is easier and more fun than ever. Whether you’re making a tote for a weekend market or a pouch for your everyday essentials, this simple addition can take your project to the next level. Ready to give it a try? Grab your pattern, pick up some Chenille It, and let your creativity shine!

Want to design pillow covers that actually match your space and your style? This step-by-step tutorial shows you how to create beautiful, customizable pillow covers using fabric you already love—no pattern needed. Whether you're decorating for a season, a holiday, or just refreshing your space, this project is quick, beginner-friendly, and totally addicting.

Prepare for BBQ Season with Benartex Fabrics' Chillin' & Grillin' Collection! As a Brand Ambassador for Benartex Fabrics, I was lucky to get to play with this collection that is perfect for summer and all of the cook-outs coming up. The best part is you don’t have to leave your sewing room to enjoy some delicious barbecue! Burgers, hot dogs, shrimp and veggies - there is everything you need to create fun aprons, grill mitts, potholders, placemats and more for your backyard feasts. Click the logo to visit the collection!
![]()
This quick tutorial will show you how to make 4 placemats - they only take a few hours from start to finish - so you could whip these up in the morning and have a decked out table by afternoon!
 Mix & Match
  Reversible Placemats
  Same Top/Bottom
If you're more of a visual learner, I've got a quick video tutorial on my Instagram - Check it out!
 New to sewing? You might also love my beginner bag tutorials➡️
MATERIALS NEEDED:
Make sure to pre-wash your fabric to prevent any post-sewing shrinkage!
1️⃣ Begin with 2 yards of fabric (or 1 yard each for reversible). Make sure it is washed and pressed before cutting, then lay out flat on cutting mat.
2️⃣ Cut placemats at 19”W x 14”H, following fabric direction.
 14" Tall
  19" Wide
 This collection includes a border stripe, which I used to cut 4 placemats. PRO TIP!!! Pay VERY careful attention to fabric direction when cutting measurements, remember 19" WIDE by 14" TALL.
3️⃣ INTERFACING:
 Let's take a minute to talk about different types you can use. Depending on what look you are going for when completed will be determined by the type of interfacing you use. I have made many placemats, and I really like the finished look and feel of Pellon 911F. It's not too fluffy, not too rigid, and gives the placemat some structure without being stiff. Choose what works best for you.
Once you have chosen your interfacing, cut out 4 pieces measuring the same dimensions as the placemat, 19"W x 14"H.
Now you may adhere the interfacing to the wrong side of the top fabric, according to manufacturer's instructions. If using batting, you can spray baste or pin, or move on to step 4.
 PRO TIP! Make sure if interfacing is fusible, bumpy side is up (ask me how I know), this is the glue side that will adhere to the fabric.
4️⃣ It's time to start assembling the placemats!
 Place a top and bottom piece right sides together (RST).
Choose a side to create the opening where you will be turning the placemat out after it is sewn together. I usually like to make the opening a little bigger than my hand.
 I place 4 fingers on a side, and mark above and below for the opening. You will not be sewing over this section, so make sure you pay attention to your marks, or you will sew the placemat completely shut and not be able to turn it out.
 Pin or clip around the outer edges of the placemat, just to keep the edges lined up until you get it to your sewing machine.
  Once you have the placemat at your sewing machine, start sewing at the bottom of the opening mark, using a 1/2" seam allowance (SA), making sure to backstitch a few times. Make sure you did not sew closed your opening!
Sew around all the sides of the placemat, stopping at the top of the opening, and backstitch again.


Do this for all placemats.
5️⃣ Here's where the magic happens! Part of the reason the seam allowance is so big, is for this trick right here.
 PRO TIP!! At the opening, you will cut away some of the seam allowance. This will create a tab, that will be folded in once you turn out the placemat, and helps for a smooth, straight edge of the finished placemat.
 If it helps, draw a line like I did here as a guide for how to cut into the seam allowance. I like to live on the edge, and I use my rotary cutter, but I've also done this many times with placemats and bagmaking. If you're nervous, draw the line, and use scissors to cut away seam allowance.

 You will end up with a "tab" which will make it easy to insert the seam allowance into the hole after it is turned out, making for a smooth, straight closing.
 Cut away the seam allowance from the four corners, taking care not to cut into the seam.

 Reach your hand in to an opposite corner, grab hold and pull placemat inside out.

 Pop out the corners with a sharp tool, but do not poke a hole in the corners.

 Once completely turned, with corners poked out, roll the edges of the seams with your fingers to help flatten before taking to the iron to press. PRO TIP! Another reason the seam allowance is 1/2" is to help with rolling the seams to make them flat. I've sewed these using 1/4" SA, as well as 3/8" SA, and it is a struggle to get perfectly flat seams. This is why I like the 1/2" SA.
 Also, finger press the extra seam allowance at the opening to help keep it inside before pressing.
 Press placemat to flatten seams, as well as opening.
6️⃣ Topstitch to close the opening, using a 3.5 mm stitch length. I like to topstitch 3 times. I sew once around using a 1/8" SA. From that stitch line, I will sew another row 1/4" away from that stitch. Then, I will sew a 1/2" away from the previous 1/4" stitch line. See examples below.

 Topstitch 1/8" from edge
Topstitch 1/4" away from previous 1/8" stitch line
 Topstitch 1/2" away from previous 1/4" stitch line
 Final showing all 3 topstitch lines
7️⃣ Your placemat is done! Final measurements should be 13"H x 18"W. Enjoy your new summer table! Feel free to leave a comment, share with a sewing bestie or ask a question.


Sign up and get my most popular beginner sewing project—the Sunset Zipper Pouch—plus weekly tips and tutorials delivered to your inbox.
👉 GET THE FREEBIE HERE
Explore beginner-friendly bag patterns and gifts for BBQ season, weddings, and more:
👜 SHOP SEWING PATTERNS | 🧺 BROWSE HANDMADE BAGS
Follow @BeMandyThings on Instagram and Facebook for sneak peeks, reels, and insider tips.


